Resources

Laravel 11, released on March 12, 2024, represents a significant evolution in the Laravel framework, continuing its tradition of delivering simplicity, elegance, and robust features for developers. With a host of new capabilities, Laravel 11 enhances productivity, streamlines application development, and introduces new tools for better security, performance, and real-time capabilities. This version empowers developers to build scalable, secure, and efficient web applications faster and more easily than ever before. Below are the key features and improvements you can expect from Laravel 11:

1. Streamlined Application Structure

Laravel 11 introduces a more minimalistic application skeleton, simplifying the structure and making it easier for developers to start new projects with reduced boilerplate code. The folder structure has been reorganized for better readability, allowing a quicker understanding of a project’s architecture.

The bootstrap/app.php file has become the central hub for key application configurations. Here, developers can now configure routes, middleware, service providers, and exception handling in a unified space. This centralization of settings enhances maintainability, particularly in large projects, making it easier to modify application-wide configurations without the need to hunt for them across multiple files.

Additionally, the simplified architecture ensures that developers new to Laravel can onboard quickly, while seasoned developers will appreciate the focus on efficiency and clarity in project structure. Many businesses, especially a Laravel development company, can benefit from these streamlined changes, improving project setups.

2. Per-Second Rate Limiting

The per-second rate limiting feature is one of Laravel 11’s most anticipated updates. In previous versions, developers could only apply rate limits on a per-minute basis. With Laravel 11, the framework now allows API endpoints and other routes to have precise per-second rate limits, giving developers greater control over traffic management.

This is especially beneficial for applications that experience high levels of traffic or need to throttle specific actions, such as login attempts or API calls. Per-second rate limiting enables more dynamic management of user requests and helps prevent abuse, ensuring fair usage across the application. The granularity also provides better protection against brute-force attacks, making security practices more efficient.

3. Health Routing

Keeping your application running smoothly requires constant monitoring of system health. Health routing in Laravel 11 enables developers to define specific routes that return the status of various parts of their application, such as the database, cache system, or third-party services.

This new feature simplifies infrastructure monitoring by integrating easily with external tools like Prometheus or Grafana, offering real-time insights into application health. Whether you’re tracking the performance of your database, your Redis cache, or external API connections, health routing ensures that potential problems can be detected early, minimizing downtime and improving response times to incidents.

Laravel 11 Features and improvement

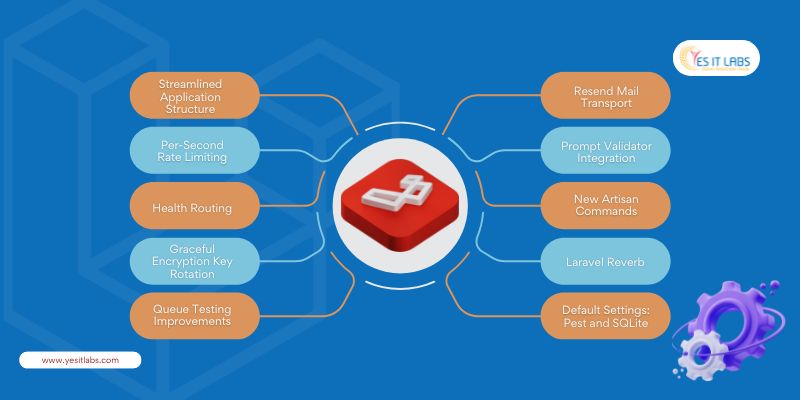
4. Graceful Encryption Key Rotation

Maintaining application security without downtime can be a challenge, especially when it comes to rotating encryption keys. Laravel 11 introduces graceful encryption key rotation, allowing encryption keys to be rotated without disrupting user sessions or data integrity.

This feature is particularly important for applications that handle sensitive data, such as financial transactions or personal information. With Laravel 11, encryption keys can be rotated as part of routine security audits or compliance requirements without affecting the live application. This means developers can increase security while ensuring continuous service availability—avoiding any user disruption during the rotation process.

Businesses that offer custom web application development services will find this feature invaluable when managing security protocols for their clients’ applications, minimizing risk during key rotations.

5. Queue Testing Improvements

In Laravel 11, queue testing has seen major improvements. Queued jobs are essential for handling background tasks such as sending emails, processing images, or handling third-party API requests. In previous versions, testing queues required complex setup, but Laravel 11 provides better testing tools to simulate job execution.

The new improvements enable developers to easily test different states of queued jobs, such as successful execution, failure, and retry logic, within their test suites. This means developers can now ensure that their background tasks run smoothly, with fewer bugs slipping through into production. With this improvement, debugging queued jobs becomes faster and more intuitive, reducing downtime for tasks that depend on them.

6. Resend Mail Transport

Communication reliability is critical for many web applications, and Laravel 11 tackles this with the introduction of Resend Mail Transport. This feature ensures that emails that fail to send on the first attempt can be automatically retried.

For developers handling high-volume email systems, this feature provides peace of mind by reducing the number of undelivered emails, such as order confirmations, password resets, or transactional messages. Configurable retry strategies mean that developers can specify custom backoff times or alternative transports to ensure email delivery, especially in scenarios where email servers might experience temporary issues.

7. Prompt Validator Integration

Validation is a critical part of web development, ensuring that incoming data from forms or APIs meets the necessary criteria. Laravel 11 introduces Prompt validator integration, enhancing the framework’s already robust validation capabilities.

This new feature simplifies the process of validating complex user input and provides more customizable feedback mechanisms. Developers can now create even more efficient validation rules for large-scale forms or nested data, improving both backend security and frontend user experience. The Prompt validator also works seamlessly with Laravel’s form request classes, offering real-time validation hints and suggestions.

For businesses looking to hire Laravel developers, this feature provides a competitive edge, as efficient validation systems can ensure higher quality applications with less effort.

8. New Artisan Commands

Laravel’s Artisan command-line interface (CLI) is one of the framework’s most powerful features, and with Laravel 11, several new Artisan commands have been added to make development tasks easier. These commands streamline everyday tasks like database management, clearing caches, handling queue workers, and running tests.

For example, the new commands related to queue management and cache invalidation allow developers to manage long-running processes without needing to manually interact with the underlying services. Artisan now offers even more tools to increase developer productivity and improve the overall application lifecycle management.

9. Laravel Reverb: First-Party WebSocket Server

One of the most exciting additions to Laravel 11 is Laravel Reverb, a scalable first-party WebSocket server designed for real-time communication. This feature allows developers to build real-time applications such as chat systems, live notifications, or dashboards without relying on third-party services like Pusher.

By integrating directly with Laravel’s event broadcasting system, Reverb makes it easy to set up WebSocket connections and broadcast updates to connected clients. This is ideal for modern applications where real-time interactions are key to user engagement. Reverb is also fully scalable, meaning it can handle anything from a small chat application to large-scale real-time data feeds.

10. Default Settings: Pest and SQLite

In Laravel 11, Pest is now the default testing framework, following a community vote led by Taylor Otwell. Pest brings a simpler and more modern syntax for writing tests, helping developers create cleaner and more readable test suites. For those still relying on PHPUnit, Pest provides full backward compatibility, so developers can enjoy the best of both worlds.

Additionally, SQLite is now the default database for new Laravel projects. This makes setting up new projects quicker and simpler, especially for rapid development and testing environments. SQLite’s lightweight nature and zero-configuration approach mean developers can start coding immediately without needing a full database server.

Professional Insights

  • Docker-First Development: Laravel 11 includes Docker-ready configurations with Laravel Sail, making local development environments more consistent across teams. Developers can spin up Docker containers that mirror production environments, ensuring there are no discrepancies between local and live setups.
  • Optimized Blade Compiler: Laravel 11’s Blade template engine has received a significant performance boost, with faster compilation times and reduced memory usage. This is particularly useful for applications with large and complex view hierarchies.
  • Tighter Integration with Laravel Octane: For high-performance applications, Laravel 11’s deeper integration with Laravel Octane allows developers to leverage long-running PHP processes with Swoole or RoadRunner. This drastically reduces request-response times by avoiding the bootstrapping overhead on every request, making it ideal for handling high-traffic APIs or microservices.

Conclusion

Laravel 11 delivers a range of new features and enhancements designed to streamline the development process, improve performance, and enhance real-time capabilities. Whether you’re working on a large-scale enterprise application or a small personal project, Laravel 11’s focus on efficiency, security, and developer experience makes it a must-have tool for modern web development. With powerful additions like Laravel Reverb, graceful encryption key rotation, and per-second rate limiting, this version sets a new standard for what developers can achieve with PHP.

In today’s digital landscape, having a professional, engaging, and functional website is no longer optional—it’s essential. However, for non-developers, the journey to creating such a site can seem daunting. This is where Odoo Website Builder steps in, offering an intuitive, robust solution that empowers anyone, regardless of technical knowledge, to craft stunning websites with ease. If you’re working with Odoo consulting services, you’ll see just how powerful this platform is when tailored to specific business needs.

Introduction to Odoo Website Builder

Odoo is widely known as an all-encompassing ERP solution, but it’s more than just that. As part of its integrated business suite, Odoo Website Builder is specifically designed for small business owners, entrepreneurs, and creatives who need a powerful online presence without having to write a single line of code. Unlike standalone website builders, Odoo’s offering is deeply tied to the ERP system, allowing seamless integration with business processes. This makes it a valuable tool for any Odoo development company that seeks to offer comprehensive solutions for business growth.

Key Features that Make Odoo Website Builder Stand Out

1. Drag-and-Drop Interface

The hallmark of Odoo’s Website Builder is its drag-and-drop interface. Users can easily add text, images, videos, forms, and more to their pages, effortlessly arranging them to form visually appealing layouts. It’s ideal for users with zero coding experience, while still offering deeper customization options for those who wish to dive further into advanced design elements via HTML/CSS if needed.

2. Responsive Design

In a world where mobile traffic has surpassed desktop, responsive design is essential. Odoo ensures that websites built on its platform automatically adjust to look great on any device—desktops, tablets, or smartphones. This responsiveness isn’t just limited to front-end visuals but extends to Odoo’s back-end modules, ensuring a smooth, consistent experience for both developers and end-users. Businesses seeking to hire Odoo developers can capitalize on this feature to deliver fully optimized, mobile-friendly sites to their clients.

3. SEO Optimization

What’s a stunning website without visibility? Odoo comes equipped with built-in SEO tools that help websites rank higher on search engines. From adding meta tags and creating XML sitemaps to tracking keywords, Odoo’s SEO suite covers the essentials and more. For advanced users, integration with tools like Google Analytics and Google Search Console is straightforward, enabling deeper performance analysis and keyword tracking. Working closely with Odoo Partners can further amplify these SEO efforts, ensuring your site performs well in highly competitive markets.

4. Templates and Customization

Odoo offers a wide selection of pre-built templates catering to various industries. Each template is fully customizable, allowing users to tweak elements such as fonts, colors, and layouts to fit their brand identity. Advanced users can leverage Odoo’s developer tools to modify templates at the code level, offering endless customization opportunities.

5. Integrated Business Apps

A significant advantage of Odoo Website Builder is its seamless integration with other Odoo apps, such as CRM, eCommerce, and Inventory Management. This interconnected ecosystem allows businesses to manage their online presence, customer relationships, and backend operations—all from one platform. Whether you’re tracking leads, managing inventory, or processing sales orders, Odoo ensures a unified and efficient workflow.

6. Multilingual and Multi-Currency Support

Odoo’s Website Builder includes multilingual and multi-currency support, making it a perfect choice for businesses targeting global markets. The platform’s intuitive language switcher and currency converters allow users to cater to a diverse audience with ease.

Advanced Features for Developers and Power Users

While Odoo Website Builder is designed with non-developers in mind, it also offers several advanced features that professional developers can leverage for deeper customization and functionality.

1. Code Access for Customization

For those with technical knowledge, Odoo allows access to the HTML/CSS/JS files of the website, enabling full control over the design and functionality. Developers can also create custom modules within the Odoo framework to extend the website’s capabilities, ensuring that unique business needs are met.

2. Versioning and A/B Testing

One of the lesser-known features is Odoo’s versioning and A/B testing capabilities. Users can create multiple versions of a page, test them in real-time, and track performance metrics. This is particularly useful for optimizing landing pages and user experiences based on actual data.

3. Security and Updates

Odoo’s security framework is another crucial aspect that professional developers appreciate. Odoo regularly releases updates and security patches to keep websites safe from vulnerabilities. Additionally, the platform supports SSL certificates and data encryption, ensuring that your website is secure for users and compliant with modern web standards.

4. Performance Optimization

Odoo websites are built with performance in mind. The platform uses modern caching techniques and content delivery networks (CDN) to ensure fast page loads, regardless of traffic volume. Odoo also provides built-in tools to optimize images and manage file compression, improving overall site speed and search engine rankings.

Why Odoo Website Builder is Ideal for Non-Developers

1. No Coding Required

Odoo requires no coding knowledge to build a professional website. The platform’s drag-and-drop interface is intuitive, allowing users to focus on design and content without worrying about the underlying code.

2. Real-Time Customization

With Odoo’s WYSIWYG (What You See Is What You Get) editor, changes are reflected in real-time, allowing users to preview adjustments as they go. This immediate feedback loop makes it easy to iterate and perfect designs without lengthy delays.

Odoo Website Builder

3. Affordable and Scalable

Odoo’s flexible pricing plans make it an attractive option for small businesses. As your business scales, Odoo grows with you, offering additional apps and features that can be added as needed, without requiring a full platform overhaul.

4. Support and Documentation

Odoo offers a wealth of documentation, including guides, forums, and community support, ensuring that users can find answers to common questions. For more complex issues, Odoo’s paid support plans offer professional assistance to keep your website running smoothly.

Here’s a rephrased version with a unique touch:

Getting Started with Odoo Website Builder

  1. Sign Up and Choose Your Plan: Begin your journey by creating an Odoo account and selecting a plan that best fits your business needs, whether you’re just starting out or looking to scale.
  2. Pick the Perfect Template: Explore the wide range of available templates and pick one that resonates with your vision. Remember, every template is fully customizable, giving you the freedom to make it your own.
  3. Design Your Website: With Odoo’s intuitive drag-and-drop editor, effortlessly add images, text, forms, and more. Tailor your design to reflect your brand’s unique style and message.
  4. Integrate Powerful Apps: Expand your website’s capabilities by integrating essential Odoo apps like CRM, eCommerce, or Inventory to streamline your business processes and create a seamless user experience.
  5. Optimize for SEO Success: Take advantage of Odoo’s built-in SEO tools to boost your site’s search engine rankings. Stay on top of performance by linking your site with tools like Google Analytics.
  6. Publish and Drive Traffic: Once you’re satisfied with the final look, publish your website with a click. Promote it across social media and other channels to attract visitors and grow your audience.

Conclusion

The Odoo Website Builder is a powerful, user-friendly tool that democratizes web development for non-developers. Its integration with the larger Odoo ecosystem makes it an excellent choice for businesses looking to streamline their operations while maintaining a professional online presence. Whether you’re launching a new business or scaling an existing one, Odoo gives you the flexibility, power, and confidence to create a website that reflects your brand’s identity—without needing to hire expensive developers.

In the fast-paced world of software development, speed and efficiency are crucial for staying ahead of the competition. One of the most effective strategies to achieve this is by employing the concept of a Minimal Viable Product (MVP). This approach emphasizes launching a product with only the essential features needed to satisfy early adopters while collecting feedback to guide future development.

What is an MVP?

An MVP is the most stripped-down version of a product that delivers enough value to attract early users and validate core assumptions about the product idea. The concept was first popularized by Eric Ries in his book The Lean Startup. The main objective of an MVP is to build a minimum viable product that allows you to enter the market quickly with minimal resources, enabling you to validate your idea, test its viability, and gather actionable feedback to iterate on future versions.

Benefits of an MVP

  1. Cost Efficiency: Developing a fully-featured product can be time-consuming and expensive. By focusing on a basic version, an MVP allows companies to test their concept without heavy financial and time commitments. This means you avoid building features that might not be necessary, saving both time and money.
  2. User-Centric Development: MVPs enable developers to gather real user feedback early in the development cycle. This direct feedback helps in refining the product according to actual user needs and preferences, instead of making assumptions about what users want.
  3. Risk Mitigation: A common risk in software development is investing significant resources in a product that ultimately fails in the market. MVPs minimize this risk by allowing companies to pivot, adjust, or even abandon a product idea based on early reactions—before spending extensive time or money on further development.
  4. Market Validation: MVPs provide an opportunity to validate market demand for a product. They allow companies to test core hypotheses about the product, market fit, and scalability based on real-world data from actual users.
  5. Faster Time-to-Market: Speed is a key factor in software development, especially in industries where first-mover advantage is critical. An MVP approach allows you to deliver a solution to users faster, often securing market position while still working on improvements.

Steps to Build an MVP

  1. Market Research: Start by deeply understanding the target audience, their pain points, and existing solutions in the market. This step is critical because identifying an unmet need or a unique value proposition will set your MVP apart from competitors.
  2. Define Core Features: Narrow down your product’s feature set to only the most essential aspects that solve the core user problem. This avoids feature bloat and ensures that the MVP remains simple and easy to use, while still delivering value.
  3. Build the MVP: Focus on developing a high-quality, functional version with just the core features. It’s important that the MVP is not just a prototype, but a usable product that delivers value, even if it lacks the bells and whistles of a complete solution.
  4. Launch and Test: Release your MVP to a target group of early adopters or beta users. Use analytics and performance metrics to track how users interact with your product. In addition to data, direct user feedback should be gathered through surveys, interviews, and support channels.
  5. Iterate and Improve: Use the insights gained from testing and feedback to drive future iterations. This involves refining existing features, fixing bugs, and gradually adding more functionality as needed. A custom software development company can help facilitate this process by tailoring the MVP according to evolving business and market needs.

custom software development companies

Additional Expert Tips for Building a Successful MVP

  • Prioritize Scalability: Even though an MVP is a basic version, it’s essential to lay a foundation that can scale. This means building with flexible architecture and using modern development practices that won’t require extensive rework as the product grows.
  • Avoid Technical Debt: While the temptation to cut corners in the MVP phase is strong, avoid accruing too much technical debt. Make sure the MVP code is maintainable, as poor quality early on can slow down future iterations.
  • Test for Stability: While you may be focusing on minimum features, the MVP should still be stable. Bugs and crashes can turn away early adopters and ruin your opportunity for useful feedback.
  • Consider Future Integration: When planning your MVP, think ahead to how it will integrate with other tools, systems, or platforms. For example, if the product will need to sync with third-party services, plan for those integrations in the future roadmap.

Real-World Examples of MVP Success

  1. Dropbox: Dropbox famously validated its product idea through a simple video that demonstrated the core functionality of file sharing and syncing. This early prototype, combined with user feedback, confirmed the need for the product and led to the development of the full platform.
  2. Airbnb: The founders of Airbnb began by renting out their own apartment and creating a basic website to validate the concept of peer-to-peer accommodation. This simple MVP allowed them to gather user feedback, secure funding, and grow into a global platform.
  3. Zappos: Before building its e-commerce platform, Zappos tested the viability of online shoe sales by posting pictures of shoes from local stores. When a customer made a purchase, they would buy the shoes locally and ship them to the customer. This helped validate the demand for online shoe shopping before investing in inventory and fulfillment.

Common Mistakes to Avoid

  1. Overloading Features: One of the most common mistakes is trying to pack too many features into the MVP. This dilutes the core value proposition and can lead to unnecessary complexity.
  2. Ignoring User Feedback: MVP success depends on gathering and acting upon user feedback. Neglecting this feedback can result in a product that fails to address the real needs of its audience.
  3. Failing to Track Key Metrics: It’s not enough to just launch an MVP—you need to track relevant performance metrics like user engagement, retention, and conversion rates. These metrics will provide insight into how well the product meets user needs.
  4. Lack of Clear Hypotheses: Every MVP should be built with specific hypotheses in mind—whether it’s about user behavior, market demand, or scalability. Without clear hypotheses, it’s hard to measure success or determine the next steps.

For entrepreneurs working with a Web developer freelancer, it’s essential to clearly communicate the project’s core requirements to ensure the MVP stays focused on solving the primary user problem, without unnecessary additional features.

Conclusion

The MVP approach is a strategic and efficient method for developing software products. By focusing on core features, gathering user feedback, and iterating based on real-world data, companies can build products that meet user needs while saving time and resources. This lean development model fosters innovation, reduces risk, and accelerates time-to-market, making it a key tool in today’s competitive landscape.

In the rapidly evolving landscape of web design and content management, creators seek tools that not only streamline their workflows but also unlock their full creative potential. Framer CMS has quickly become a go-to solution for designers and developers who demand flexibility, speed, and powerful integration. Let’s explore why Framer CMS is the platform of choice for modern creators.

Ease of Use

Intuitive Interface: Framer CMS is designed with user experience at its core. Its intuitive UI allows creators of all skill levels to manage their content effortlessly, removing the friction often associated with complex CMS platforms. Whether it’s adding, editing, or deleting content, Framer CMS offers an uncluttered and enjoyable experience, reducing time spent on content management and allowing users to focus on creativity.

Dynamic Content Management

Framer CMS excels in managing dynamic content with efficiency and precision. Advanced features like Collection References allow users to cross-reference data across multiple collections, ensuring seamless updates and reducing redundancy. This architecture is invaluable for large-scale websites with recurring elements like author profiles, product listings, or multi-category blogs, offering a clean separation of concerns that optimizes both workflow and site performance. Whether you’re building a custom website development service or an e-commerce platform, Framer CMS adapts to your specific needs.

Design Flexibility

Limitless Design Freedom: Unlike many CMS platforms that impose rigid templates, Framer CMS empowers creators with unparalleled flexibility. Using component-driven design methodologies, professionals can build reusable components that adapt to different content types. This level of customization ensures that your designs not only align with your vision but also remain scalable as your project grows. Professionals appreciate how Framer’s design flexibility supports both rapid prototyping and pixel-perfect execution.

Why YES IT Labs is the Best Custom Website Development Service for Framer CMS

When it comes to leveraging the full potential of Framer CMS, YES IT Labs stands out as the top choice for custom website development services. With a deep understanding of Framer’s dynamic content management and design flexibility, YES IT Labs delivers tailored solutions that are perfectly aligned with each client’s vision. Our team of experienced developers and designers are experts in creating highly optimized, visually striking websites using Framer CMS, ensuring seamless performance, enhanced user experience, and full scalability. Whether you need a sophisticated business site or a high-performing e-commerce platform, YES IT Labs provides the expertise and innovation to bring your Framer CMS projects to life.
Hire Framer Developer

Seamless Integration

Unified Design and Development Workflow: Framer CMS bridges the gap between design and development. With native Figma and Sketch import features, it allows teams to prototype in their favorite design tools and bring those designs directly into the CMS. Its integration extends further into key development tools, enabling custom code and third-party APIs to coexist with no-code solutions. This unification minimizes the friction of jumping between different tools, significantly speeding up production timelines. This makes Framer a strong choice for companies ranging from startups to an IT consulting company managing diverse projects.

Speed and Efficiency

Optimized for Performance: High-level professionals recognize Framer CMS’s dedication to speed. With automatic asset optimization, lazy loading, and native CDN integration, every project is engineered to perform efficiently across devices and geographies. Its backend architecture is built for scalability, ensuring smooth performance whether you’re building a personal portfolio or an enterprise-level site. Professionals value these features as they help avoid common pitfalls like slow page loads or unoptimized assets that can affect SEO and user experience.

Collaboration and Team Management

For teams, Framer CMS offers real-time collaboration features that allow multiple users to work on the same project simultaneously. Built-in version control ensures that changes are trackable, and if needed, previous iterations can be restored. This is especially beneficial for agencies or large businesses where multiple stakeholders are involved. Teams can leave comments, request changes, and provide feedback in an integrated environment, significantly reducing the communication gap between designers, developers, and content creators.

SEO Optimization

Framer CMS is equipped with advanced SEO tools out of the box, allowing professionals to manage structured data, meta tags, and page-specific SEO optimizations. For those deeply involved in technical SEO, Framer CMS also provides access to the underlying code, enabling experts to customize things like canonical tags, Open Graph data, or advanced schema markups that will boost SERP performance.

Performance Insights and Analytics

One feature that sets Framer CMS apart for professionals is its integration with advanced analytics tools. From heatmaps to session recordings, Framer allows teams to get a granular understanding of user behavior. This helps creators make data-driven design decisions that enhance UX and conversion rates. Built-in A/B testing capabilities allow users to test different design elements without needing to rely on third-party tools, making iterative design improvements fast and effective.

Custom Code Integration

For high-level developers, Framer CMS provides deep customization capabilities through JavaScript, React components, and custom APIs. The CMS allows you to inject custom code at any level, making it an ideal platform for building highly interactive and responsive websites. Whether integrating complex forms, third-party tools, or server-side rendering, Framer offers the flexibility required for professional-grade web applications without limiting your creativity.

Security and Compliance

One aspect that often goes unnoticed by beginners is the robust security infrastructure Framer CMS provides. High-level professionals value the platform’s commitment to data protection, SSL encryption, and compliance with global GDPR standards. It also features automated backups and disaster recovery options, which are critical for business continuity, especially for larger enterprises.

Community and Support

Thriving Ecosystem: Framer CMS is more than a tool—it’s part of a rapidly growing ecosystem. The community offers a wealth of resources, from pre-built components to open-source projects that can accelerate your work. Advanced users benefit from the network of professional designers and developers who regularly share plugins, extensions, and cutting-edge workflows. In addition, Framer’s support team offers dedicated assistance to professionals, ensuring that any technical roadblocks are resolved swiftly.

Conclusion 

Framer CMS is designed for creators who demand both power and simplicity. With its intuitive interface, powerful content management features, and seamless integration with design tools, it provides a one-stop solution for managing dynamic websites. High-level professionals appreciate its advanced performance insights, custom code integration, and robust security features, making it a top-tier choice for building professional-grade websites that stand the test of time. Whether you’re an individual creator, running a custom website development service, or part of a large-scale IT consulting company, Framer CMS offers the flexibility and performance you need to succeed in today’s digital landscape.

Creating a dating app like Tinder requires a blend of technical expertise, meticulous planning, and significant financial investment. It’s not just about coding an app, but about delivering a user experience that is engaging and seamless. This guide will take you through the process and costs involved in building a dating app.

1. Planning and Research

Before development begins, thorough planning and research are crucial. This includes analyzing your target audience, identifying market gaps, and defining your app’s unique value proposition. You’ll also need to consider regulations such as GDPR and CCPA for data protection and user privacy. Engaging a mobile application development company to assist with this stage can help streamline the process, with costs ranging from $5,000 to $20,000 depending on the level of research and consultation required.

2. App Design (UI/UX)

The design phase is critical to ensuring an intuitive, visually appealing user interface. This includes wireframing, prototyping, and finalizing the UI. Investing in a high-quality design will enhance the user experience, leading to higher engagement and retention rates. Costs can vary from $10,000 to $70,000, depending on complexity. Whether you are targeting iOS App Development or Android App Development, it’s essential to prioritize responsive designs that work seamlessly across different platforms.

3. Development

Development is where the majority of the budget will be spent, and it can be divided into three main areas: frontend, backend, and the admin panel.

  • Frontend Development: This involves building the user interface, ensuring compatibility across devices, and implementing interactive features. Using frameworks like React Native for cross-platform functionality or going native with Swift (iOS) and Kotlin (Android) can impact costs, which range from $20,000 to $100,000.
  • Backend Development: The backend is where the app’s core functionality resides, handling user data, matchmaking algorithms, and real-time communication. Backend development can involve significant expenses, from $30,000 to $150,000, depending on the complexity of your app. If you plan to integrate advanced features such as real-time messaging and geolocation, your costs will rise accordingly.
  • Admin Panel Development: The admin panel is essential for managing users, monitoring analytics, and handling content moderation. This can cost between $5,000 and $25,000, depending on the features needed.

4. Advanced Features

To make your app competitive, you may want to include advanced features:

  • Real-time Chat and Messaging: Real-time communication, one of the core features of dating apps, typically requires the integration of socket connections or APIs like Firebase. This can range between $10,000 to $40,000.
  • Geolocation Services: Geolocation is essential for matching users based on proximity, using APIs like Google Maps. Costs range from $5,000 to $20,000.
  • Matching Algorithms: Developing sophisticated algorithms that match users based on preferences and behavior can be complex. Using AI-driven algorithms can push development costs between $20,000 to $50,000.
  • Social Media Integration: Integrating social media platforms for easy sign-ups or profile verification (e.g., Facebook, Instagram) costs between $2,000 to $12,000.

5. Testing and Quality Assurance (QA)

Rigorous testing is vital to ensure the app is bug-free and functions smoothly across all devices. QA involves functional, usability, and security testing. Additionally, performance testing is critical for apps that handle large amounts of real-time data. Quality assurance services typically cost between $10,000 to $35,000. Whether you’re developing an MVP or a full-featured app, this phase ensures your product meets industry standards.

6. Deployment

Deploying your app involves not only publishing it on platforms like Apple’s App Store and Google Play Store, but also preparing for app store optimization (ASO) and post-launch marketing. The deployment costs, including registration fees and promotional strategies, range from $5,000 to $15,000.

7. Maintenance and Updates

Once your app is live, ongoing maintenance is critical. This involves regular updates to fix bugs, add new features, and ensure compatibility with new operating system versions. A mvp software development strategy can help you manage these updates effectively, focusing on iterative improvements. Annual maintenance costs can vary between $20,000 to $70,000, depending on the scale of the app.

Cost to Make a Dating App Like Tinder
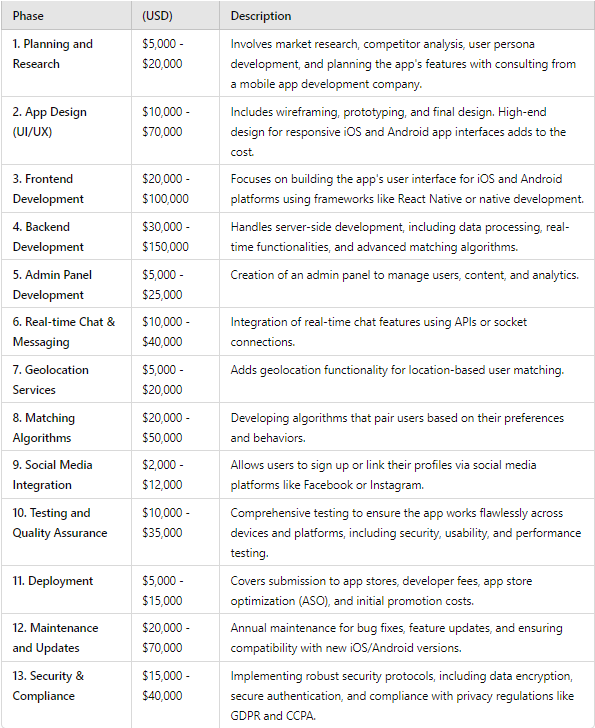
Other Considerations

Technology Stack

Your choice of technology stack plays a significant role in both the development time and the cost. Popular tech stacks for dating apps include:

  • Frontend: React Native (cross-platform), Swift (iOS), Kotlin (Android)
  • Backend: Node.js, Ruby on Rails, Python with Django
  • Database: MongoDB, MySQL, PostgreSQL
  • Real-Time Communication: WebSockets, Firebase, Twilio
  • Cloud Hosting: AWS, Google Cloud, Microsoft Azure

Choosing the right stack, particularly for iOS App Development or Android App Development, will ensure your app performs well and scales effectively as your user base grows.

Security and Compliance

Dating apps manage highly sensitive user information, making robust security measures an essential priority. Integrating end-to-end encryption, secure login protocols, and regular security audits can significantly reduce the risk of data breaches. Compliance with data privacy laws like GDPR and CCPA is also mandatory, particularly if you plan to operate in international markets. Implementing these protocols can cost an additional $15,000 to $40,000.

Portfolio Example

At YES IT Labs, we have extensive experience in creating feature-rich, secure dating apps. For instance, check out our work on the FLRT App, a cutting-edge dating platform designed with a user-first approach and scalable backend architecture.


Total Cost Estimate

Considering all phases of development, the cost of creating a dating app like Tinder can range from $120,000 to $600,000, depending on the complexity and the features you wish to include. For those looking to reduce upfront costs, an MVP approach, focusing on the core features necessary to test the market, can be a more cost-effective option, with initial expenses between $50,000 to $100,000.

Conclusion

Building a dating app like Tinder is a multifaceted and resource-intensive process, requiring collaboration between designers, developers, and testers. Partnering with a reputable mobile application development company ensures that you get a product that not only meets market demands but also complies with technical and legal standards. With the right approach and team, you can create an app that stands out in th competitive dating app market.

FAQs

1. What are the essential features needed to launch an MVP for a dating app like Tinder?

An MVP (Minimum Viable Product) for a dating app should include user profiles, geolocation-based matching, swiping functionality, and real-time messaging.

2. How do advanced features like AI-driven matchmaking affect the overall cost of development?

Incorporating AI-driven matchmaking algorithms can significantly increase costs, ranging from $20,000 to $50,000 depending on the complexity and data processing requirements.

3. Can I reduce development costs by outsourcing to a mobile app development company?

Yes, outsourcing to regions with lower development costs can reduce expenses, but it’s crucial to balance cost with quality to ensure a successful app.

Cross platform app development is the craft of building mobile applications that function smoothly across multiple operating systems, such as iOS, Android, and even Windows. It allows developers to write code once and deploy it across all platforms, which has become essential as mobile device fragmentation rises. This approach helps businesses expand their reach without the expense of maintaining separate codebases for each platform. However, despite its advantages, achieving native-like performance and seamless integration with platform-specific features remains a challenge that requires advanced techniques and in-depth knowledge of development tools.

Benefits of Cross-Platform Development

  • Cost-Efficiency: By using a single codebase, development and maintenance costs are significantly reduced. This unified approach avoids duplicating efforts for different platforms, streamlining ongoing updates and bug fixes.
  • Faster Time to Market: A unified development process enables faster iteration cycles, accelerating deployment. By shortening the feedback loop between design, development, and deployment, developers can meet tight deadlines and stay competitive.
  • Uniformity: Ensures a consistent user experience across platforms. However, this requires careful attention to platform-specific user interface (UI) guidelines to maintain the native look and feel.
  • Resource Optimization: Leverages a single team of developers with cross-platform expertise rather than managing separate teams for iOS and Android. This is particularly useful when considering iOS apps development services, as the same team can handle both iOS and Android, cutting down on the complexities of managing separate teams.

Popular Frameworks and Tools

1. Flutter

Created by Google, Flutter uses the Dart programming language and enables developers to create natively compiled apps for mobile, web, and desktop from a single codebase.

Pros:

  • Hot Reload: This allows developers to instantly see the effect of changes without restarting the entire app. This drastically improves development speed, especially during UI iteration.
  • Rich Set of Widgets: Flutter provides pre-designed widgets that adhere to Material Design for Android and Cupertino for iOS, giving the apps a native feel.

Cons:

  • Larger App Sizes: Flutter apps tend to have larger binaries due to the inclusion of Flutter’s rendering engine and core libraries.
  • Limited Native Support: Although expanding, Flutter’s ecosystem may lack some deep native modules compared to mature frameworks like React Native or Xamarin.

For businesses looking to scale quickly, many opt to hire Flutter developers due to their expertise in building responsive, scalable cross-platform applications.

2. React Native

Maintained by Facebook, React Native allows you to build mobile apps using JavaScript and React. It renders UI using native components, ensuring a more authentic appearance and performance.

Pros:

  • Extensive Library Support: React Native benefits from JavaScript’s vast ecosystem, providing developers access to thousands of third-party libraries.
  • Strong Community and Frequent Updates: Active community involvement means rapid innovation, regular framework updates, and access to a vast pool of knowledge.

Cons:

  • Performance Lag: React Native apps may lag behind native apps in performance-intensive areas like animations or complex graphics.
  • Challenging UI Design: While React Native supports native rendering, replicating complex custom UI and animations can require writing native code or additional optimization.

Companies often turn to a React Native development company to ensure their app is optimized for both platforms without sacrificing performance or native look and feel.

3. Xamarin

Owned by Microsoft, Xamarin uses C# and .NET, enabling the development of iOS, Android, and Windows apps with a shared codebase.

Pros:

  • Strongly Typed Language: C# offers compile-time checking, reducing errors early in the development process.
  • Access to Native APIs: Xamarin allows deep integration with native APIs, giving developers flexibility for platform-specific features without sacrificing the benefits of code sharing.

Cons:

  • Learning Curve: Developers unfamiliar with C# and .NET face a steeper learning curve, particularly when transitioning from web or mobile JavaScript-based environments.
  • Delayed Updates: Xamarin sometimes lags behind in support for the latest OS versions or features, making it necessary to implement custom integrations for early adopters.


Cross Platform Development Strategy

Development Techniques

1. Code Sharing and Reuse

Efficient cross-platform development hinges on writing reusable code components that can be deployed across all platforms. Developers should focus on separating the business logic from the UI, using shared libraries and modules to minimize platform-specific implementations. When writing platform-specific code becomes inevitable (e.g., accessing device hardware), compartmentalizing it into modules allows the rest of the codebase to remain uniform.

2. Consistent UI/UX Design

While functionality may remain the same across platforms, users expect platform-native UI/UX interactions. Developers should design the UI to conform to platform-specific design guidelines (e.g., Material Design on Android and Human Interface Guidelines on iOS). For professional-level apps, leveraging conditional rendering or using hybrid design patterns can create an optimal balance between consistency and native experience.

3. Performance Optimization

Cross-platform apps can face performance bottlenecks, especially when complex calculations or animations are involved. Addressing these issues involves:

  • Optimizing Rendering: Use lazy loading, virtual lists, or off-screen rendering for heavy components.
  • Native Code Integration: Integrate native code where performance matters (e.g., animations, graphics).
  • Memory Management: Monitor memory usage across platforms, as inefficient memory handling can lead to crashes, particularly on devices with limited resources.

4. Testing

A robust testing strategy is critical. Developers should automate unit tests for core business logic using shared test suites, while platform-specific behavior must be validated using UI testing tools like Appium, Expresso, or XCTest. This approach allows rapid iteration cycles and quick detection of platform-specific bugs.

Challenges and Solutions

1. Performance Issues

Cross-platform apps may still fall short of the performance benchmarks set by native apps, especially in areas requiring intensive calculations or graphical rendering. To mitigate this, developers can:

  • Use Native Modules: For CPU/GPU-heavy tasks, write native code in Swift (iOS) or Kotlin (Android) to offload critical work.
  • Profile Regularly: Tools like Flutter’s DevTools or React Native’s performance monitor can help identify bottlenecks early.

2. Platform-Specific Bugs

It’s common for bugs to appear on one platform but not on others. Keeping platform-specific components modular, well-tested, and documented can reduce the complexity of managing these discrepancies. Continuous integration systems like Jenkins, CircleCI, or GitHub Actions can automate tests across multiple platforms.

3. Limited Access to Native Features

Some cross-platform frameworks may not support certain native features. In such cases, writing custom plugins in the native language and integrating them with the cross-platform framework is often the best solution. Many frameworks, like Flutter and React Native, have mechanisms (e.g., platform channels, native modules) that allow seamless integration of native code.

Conclusion

Mastering cross-platform app development requires a balance between leveraging the right tools, employing optimal development techniques, and constantly refining processes to meet platform-specific demands. Frameworks like Flutter, React Native, or Xamarin provide powerful options for developers to create highly performant and visually appealing apps across different platforms. By focusing on code reuse, maintaining platform-specific UI consistency, and optimizing for performance, developers can deliver seamless experiences that satisfy users on every platform.

In the era of digital transformation, custom web applications have become essential for businesses seeking to gain a competitive edge. Leveraging custom web application development services is no longer a luxury but a necessity for organizations aiming to create tailored solutions that address specific business needs. However, building a robust custom web application is no small feat. It requires deep technical expertise, a clear roadmap, and an agile mindset. This guide provides you with a comprehensive, engaging, and unique roadmap to building a high-performing custom web application.

1. Define Your Objectives and Requirements

Before any code is written, it’s crucial to clearly define the goals and requirements of your web application. You need to outline the core objectives, identify the target audience, and determine the primary functionalities. This phase typically involves gathering insights from stakeholder interviews, conducting competitive analysis, and even user journey mapping to ensure the application meets both business goals and user expectations. Partnering with a software development service provider can help streamline this phase, bringing in the right expertise to align technical feasibility with strategic goals.

2. Choose the Right Technology Stack

Choosing the right technology stack is critical for your project’s long-term success. This decision should be based not only on the application’s current requirements but also on scalability, maintainability, and developer expertise within your team. Popular front-end frameworks include React for its flexibility and performance, or Angular for more complex, large-scale applications. For back-end solutions, consider Node.js for its event-driven architecture, or Django for projects that require fast development with secure defaults. On the database side, PostgreSQL is a go-to for relational data, while MongoDB is better suited for document-oriented needs. Also, factor in performance optimizations such as choosing Redis for caching or GraphQL for efficient data querying. Don’t forget to choose a CSS preprocessor like Sass for maintainable stylesheets in complex UIs.

3. Plan the Architecture

A well-thought-out architecture ensures your application is scalable and maintainable. Depending on the application’s complexity and traffic requirements, you may opt for a monolithic architecture for simplicity or microservices for more scalability and flexibility. In recent years, serverless architecture using AWS Lambda or Azure Functions has gained traction, particularly for projects that experience fluctuating loads or for MVPs that need to be developed quickly. Consider setting up load balancing and CDNs (Content Delivery Networks) to optimize content delivery and improve user experience. This is also the stage to choose between NoSQL vs. SQL databases based on the nature of your data models.

4. Development Environment Setup

Setting up a productive development environment is often overlooked, but it’s crucial for the development team’s efficiency. Ensure proper version control using Git with branching strategies (like GitFlow) to facilitate smooth collaboration. Set up IDEs like Visual Studio Code or JetBrains IDEs with necessary plugins, linters, and code formatters for best practices. Automate testing, linting, and code analysis using tools like Jenkins or GitHub Actions for CI/CD pipelines. Docker can be used to standardize development environments, minimizing the “it works on my machine” problem.

  1. Frontend and Backend Development

Development is typically split between front-end and back-end. For front-end development, consider using component-based frameworks like React or Vue.js for better scalability and reusability of UI elements. Ensure that your web app is responsive by adopting mobile-first design principles, and optimize performance by lazy-loading assets and minimizing DOM manipulations. Backend development focuses on creating a secure and scalable API, using best practices such as RESTful architecture or GraphQL depending on the complexity of the data interactions. Ensure proper ORM (Object-Relational Mapping) tools like Sequelize or SQLAlchemy are used to simplify database interactions. Secure authentication and authorization systems should be implemented using OAuth 2.0 or JWT (JSON Web Tokens).

  1. Roadmap to Building Custom Web Applications

6. Implement Security Measures

Security should be baked into every layer of your web application. Besides the obvious safeguards like protecting against SQL injection, XSS, and CSRF attacks, ensure that all external communications use HTTPS with SSL certificates. Follow the OWASP Top Ten recommendations, and use Content Security Policy (CSP) headers to prevent XSS attacks. Regularly update dependencies to avoid vulnerabilities introduced by third-party libraries. Implement role-based access control (RBAC) to protect sensitive data and use multi-factor authentication (MFA) where applicable. Ensure that passwords and sensitive data are encrypted using hashing algorithms like bcrypt.

7. Testing and Quality Assurance

Testing is an essential part of the development process. Apart from unit tests, consider integration tests to ensure that all modules of the application work together as expected. End-to-end (E2E) tests using tools like Cypress or Selenium can simulate user interactions to verify the app behaves as expected in real-world scenarios. Performance testing using tools like Lighthouse or JMeter should be performed to identify bottlenecks. It’s also critical to conduct accessibility testing to ensure your app complies with WCAG standards, providing a seamless experience for all users.

8. Deployment and Scaling

When it comes to deployment, reliability and scalability are key. Automate deployment pipelines using CI/CD tools like GitLab or CircleCI. Choose reliable cloud hosting platforms like AWS, Azure, or Google Cloud, ensuring services like Elastic Load Balancing (ELB) and Auto Scaling Groups are configured for scaling. Use Docker containers for easy horizontal scaling and manage them with Kubernetes or Docker Swarm. Additionally, implement blue-green deployment strategies to minimize downtime during new releases, and always have rollback mechanisms ready.

9.Monitoring and Maintenance

Post-deployment, ongoing monitoring and maintenance are essential to ensure your application continues to perform optimally. Tools like New Relic, Datadog, or Prometheus can monitor real-time application performance and send alerts in case of anomalies. Log management systems like ELK Stack (Elasticsearch, Logstash, and Kibana) or Graylog should be implemented for comprehensive log analysis. Don’t forget to regularly apply security patches and conduct penetration tests to ensure ongoing security. Automated backups and disaster recovery plans should be in place to mitigate potential data loss.

10.Gather Feedback and Iterate

After deployment, gathering continuous feedback from users and stakeholders is crucial for iterating and improving the application. Tools like Hotjar or Google Analytics can track user behavior and identify pain points in user experience. Regularly release feature updates based on this feedback while prioritizing bug fixes and security patches. Conduct code reviews to ensure that the codebase stays maintainable and avoid technical debt.


Conclusion

Building a robust custom web application requires a careful balance of technical expertise, planning, and iteration. By leveraging custom web application development services and following this roadmap, you can create a web application that not only meets your business objectives but also delivers exceptional performance and user experience. Stay agile, embrace new technologies, and continuously refine your approach to remain competitive in a fast-evolving digital landscape.

Listen this Blog Podcast on Spotify

FAQs

1. What are custom web application development services, and why are they important?

Custom web application development services involve creating tailored web applications specifically designed to meet the unique needs of a business. Unlike off-the-shelf solutions, these custom applications offer flexibility, scalability, and functionality that align perfectly with a company’s specific processes and goals. They are important because they help businesses improve operational efficiency, enhance user experiences, and gain a competitive advantage by offering features and services that fit their exact requirements.

2. How do I choose the right technology stack for my custom web application?

Choosing the right technology stack depends on the project’s specific requirements, including scalability, security, performance, and maintenance needs. You should consider front-end frameworks like React or Angular for the user interface, back-end technologies like Node.js or Django for server-side operations, and databases like PostgreSQL or MongoDB for data storage. In addition, it’s important to think about the future growth of your application, the availability of developers familiar with the chosen stack, and how well the technologies integrate with each other.

3. What are the main security measures to implement in a custom web application?

Implementing robust security measures is essential for protecting a custom web application from cyber threats. Key practices include using HTTPS for secure communication, safeguarding against SQL injection, Cross-Site Scripting (XSS), and Cross-Site Request Forgery (CSRF) attacks, and enforcing strong authentication and authorization protocols like OAuth 2.0 or JWT. Additionally, encrypt sensitive data, regularly update third-party libraries to patch vulnerabilities, and conduct security audits and penetration tests to identify and fix security gaps.

4. What is the role of testing and quality assurance in custom web application development?

Testing and quality assurance (QA) play a crucial role in ensuring that a custom web application is stable, secure, and user-friendly. It involves various types of tests, including unit tests to check individual components, integration tests to ensure different modules work together, and end-to-end tests to simulate real user interactions. Automated testing tools can help catch bugs early in the development process, while User Acceptance Testing (UAT) ensures the application meets business and user requirements before going live. QA helps maintain a high standard of performance and minimizes post-launch issues.

5. How do I ensure my custom web application is scalable after deployment?

To ensure your custom web application can scale effectively after deployment, use cloud hosting platforms like AWS, Azure, or Google Cloud that offer auto-scaling services. These platforms allow your application to handle increased traffic by automatically adjusting resources like CPU, memory, and storage. Implement load balancers to distribute traffic efficiently, and use containerization tools like Docker with orchestration solutions like Kubernetes to streamline scaling. Additionally, optimizing code for performance and conducting regular load testing will help ensure your application scales seamlessly as demand grows.

In today’s digital landscape, having a mobile app can significantly enhance your business’s reach and efficiency. However, the challenge often lies in balancing cost and quality when hiring a mobile app developer. This guide provides actionable tips to help you hire mobile app developers on a budget without sacrificing quality.

1. Define Your Project Requirements

Before you start searching for developers, it’s essential to clearly outline your project requirements. This includes:

  • App Features: List the core and optional features. Prioritize essential features to minimize initial development costs.
  • Platform: Decide whether you need an app for iOS, Android, or both. You can also consider cross-platform frameworks like Flutter or React Native, which allow for developing both iOS and Android apps with a single codebase, reducing costs.
  • Design: Sketch out the basic app design and user interface (UI). Simple, functional designs tend to be more cost-effective than complex, custom-built UIs.

Having a well-defined project scope not only aids in effective communication with developers but also helps prevent scope creep, which can lead to unexpected cost increases later.

Pro Tip: If your budget is extremely tight, consider using no-code platforms like Bubble or AppGyver, which allow you to create functional apps with minimal coding. These platforms are perfect for building an MVP or proof-of-concept before investing in full-scale development.

2. Set a Realistic Budget

Determine your budget, and make sure it accounts for:

  • Development Costs: These vary widely depending on the developer’s location, experience, and the complexity of your app.
  • Design Costs: If you require a professional designer, include their fees as well.
  • Post-Launch Costs: Include ongoing costs like app maintenance, updates, server hosting, and potential bug fixes. Also, plan for any app store listing fees, which can vary by platform.

If you’re working with a software development company in USA, be mindful that development costs may be higher compared to Offshore Software Development Company. However, you may benefit from better communication, faster turnaround times, and easier legal compliance.

Cost Expectations: How Much Should You Budget?

Overall cost for mobile app development

  • Freelance Developers:
    • Rates by Region:
      • USA/Western Europe: $50 – $150 per hour
      • Eastern Europe: $25 – $50 per hour
      • India/Southeast Asia: $15 – $30 per hour
    • Project Costs:
      • Simple app (basic functionality): $5,000 – $20,000
      • Moderate app (with backend, user accounts, or payments): $20,000 – $50,000
      • Complex app (advanced features, AI integration, or custom animations): $50,000 and up
  • Development Agencies:
    • USA-based Agencies: $100,000 and up for complex projects
    • Offshore Agencies (Eastern Europe, India, Southeast Asia): $20,000 – $60,000 for mid-range projects
  • In-House Developers:
    • Salary (USA): $80,000 – $150,000 annually per developer
  • Post-Launch Costs:
    • Maintenance: $5,000 – $15,000 annually
    • Hosting & Servers: $500 – $5,000 annually
    • Marketing & Updates: Consider app store fees and major updates after launch.

Pro Tip: If you’re on a tight budget, consider building a Minimum Viable Product (MVP), which can cost $10,000 – $30,000. An MVP helps you validate your concept before committing to full development.

3. Choose the Right Hiring Model

There are several hiring models to choose from, depending on your needs:

  • Freelancers: Ideal for small projects or startups. Freelancers usually cost less but require more hands-on management. Be sure to vet them properly to avoid hidden costs due to inexperience.
  • Development Agencies: Best for larger projects. Agencies typically provide a full-service approach, handling development, design, and post-launch support, but come at a higher price.
  • In-House Developers: Suitable if your project requires continuous updates or maintenance. This is a more costly option, with salaries, benefits, and equipment to consider, but it offers higher long-term control.

4. Leverage Global Talent

Hiring developers from regions with lower living costs can help you stretch your budget. Developers from countries like India, Eastern Europe, or Latin America often offer competitive rates while still maintaining high-quality standards.

However, time zone differences, cultural communication styles, and language proficiency should be taken into account. Opt for developers who have demonstrated successful collaboration on international projects to avoid miscommunication and delays.

5. Use Online Platforms

Several online platforms allow you to hire budget-friendly developers:

  • Upwork: A broad range of freelancers with varying skills and price points.
  • Freelancer: Ideal for short-term or small-scale projects.
  • Toptal: Known for offering top-tier freelancers, though at a premium.
  • GitHub: For discovering developers who contribute to open-source projects, giving you insight into their coding style and expertise.

When you consider hiring through a mobile application development company, ensure they have experience with projects of a similar scale and industry. This can help avoid delays and ensure the app meets your business needs.

6. Conduct Thorough Interviews

When interviewing developers, dig deeper than just technical skills. Key areas to evaluate include:

  • Technical Expertise: Ensure they are proficient in the programming languages and frameworks you need (e.g., Swift for iOS, Kotlin for Android, or cross-platform options like Flutter).
  • Previous Work: Review their portfolio, focusing on apps similar to yours. Pay attention to UI/UX, performance, and user reviews of their previous apps.
  • Communication Skills: Effective communication is crucial, particularly with remote teams. Gauge how well they can explain technical concepts.
  • Problem-Solving Ability: Ask for specific examples of how they handled complex technical challenges. Developers who can anticipate potential roadblocks will save you time and money in the long run.

7. Negotiate Terms and Conditions

Once you’ve selected a developer or agency, negotiate the contract terms. Key points to consider:

  • Payment Structure: Agree on a payment schedule tied to key project milestones. Consider a 50/30/20 split, with 50% paid upfront, 30% at mid-project, and the final 20% upon completion.
  • Ownership of Code: Ensure that you will own the source code and intellectual property once the project is complete.
  • Project Timeline: Define milestones with deadlines. Be realistic but firm to avoid prolonged timelines that can inflate costs.
  • Maintenance and Support: Ensure post-launch support is included, whether through bug fixes or ongoing updates.


8. Utilize Project Management Tools

To streamline collaboration and ensure transparency, use project management tools such as:

  • Trello: For simple task management and visual workflows.
  • Asana: For tracking tasks, deadlines, and team collaboration.
  • Jira: Ideal for more complex software development projects, especially if you’re following Agile methodologies.
  • Slack or Microsoft Teams: For real-time communication with your developer(s).

Using these tools ensures that everyone is aligned and helps in spotting potential delays or bottlenecks early on.

9. Start with a Small Project

If you’re uncertain about a developer’s ability to handle your entire project, start by assigning a smaller project or phase. This could be creating an MVP (Minimum Viable Product) or prototyping. This trial run allows you to evaluate their work quality, communication, and adherence to deadlines before making a larger financial commitment.

Pro Tip: Consider phased development—instead of developing the entire app at once, start with an MVP and gradually add more features based on user feedback. This approach allows you to stay within budget while ensuring you’re building what your users actually need.

10. Focus on Long-Term Relationships

Building a long-term relationship with a developer or agency can result in better rates and higher quality output. Developers who understand your business model, target audience, and long-term goals will often suggest cost-saving solutions or features that you might have overlooked.

Furthermore, a long-term developer is more likely to provide better post-launch support and updates, which ensures your app stays functional and relevant as your business grows.

Conclusion

Hiring mobile app developers on a budget is possible with careful planning and the right approach. By clearly defining your project requirements, exploring global talent, and utilizing online platforms, you can find skilled developers who will meet your needs without exceeding your budget. Remember, while cutting costs is important, ensuring the quality of the final product is equally crucial for your app’s success.

As artificial intelligence (AI) continues to reshape the digital landscape, iOS developers are at the forefront of creating intelligent, intuitive apps that respond to users’ needs in real-time. Apple’s investment in AI tools such as Core ML and SiriKit has unlocked new possibilities, enabling developers to build apps that feel both personal and contextually aware. This article explores how AI, particularly through Siri and machine learning frameworks, is changing the face of iOS app development.

1. Siri’s Transformation with Apple Intelligence

Since its introduction in 2011, Siri has transformed from a basic voice assistant to a sophisticated, AI-driven platform. With Apple Intelligence, Siri is gaining capabilities that move it closer to a true virtual companion.

What Apple Intelligence Brings to Siri:

  • Typing to Siri: One of the most user-friendly additions is the ability to type queries instead of speaking them. This not only improves accessibility but also enhances usability in situations where speaking aloud isn’t convenient, such as in quiet environments or when privacy is a concern.
  • Natural Conversations: Siri has made significant strides in understanding and generating natural language. Apple has trained Siri using advanced natural language processing (NLP) models, which enables it to maintain context across multiple interactions. For instance, you can ask follow-up questions without restating the original query. While Siri occasionally misinterprets complex requests, this conversational improvement makes interacting with it feel more fluid and human-like.
  • Custom Wake Words: For years, users were restricted to the default wake phrase “Hey Siri.” Apple now offers customization, allowing you to set your own trigger word, making Siri feel more personalized to your preferences.
  • Developer Integration with SiriKit: SiriKit, Apple’s framework for integrating Siri functionality into third-party apps, has expanded with Apple Intelligence. As a developer, you can now tap into Siri’s intelligence to add voice-driven experiences to your apps, such as voice commands for ordering food, booking rides, or controlling smart home devices. The ability to create shortcuts using Shortcuts API further enhances user interaction by allowing automation of complex tasks through simple voice triggers.
  • UI Overhaul: Siri’s interface has undergone a subtle, yet impactful, redesign. Rather than occupying the entire screen with the familiar orb at the bottom, Siri now integrates more seamlessly into the UI, illuminating the edges of your device without blocking your view. This design change keeps Siri visually present without interrupting your workflow.

Rollout Timeline:

Apple is releasing these updates in stages. Initially, only U.S. English users will experience the full suite of new Siri features, but localized versions in Chinese, French, Japanese, Spanish, and more will follow.

2. How Siri Works Behind the Scenes

For developers interested in AI and machine learning, understanding how Siri operates behind the scenes provides valuable insights into building similar intelligent features within your own apps.

  • Deep Neural Networks (DNN): Siri’s voice recognition and query processing rely heavily on DNNs. These neural networks are trained on vast datasets, enabling Siri to identify speech patterns, process queries, and generate responses with a high degree of accuracy. Apple’s use of on-device processing means these models run locally on users’ devices, ensuring faster response times while keeping sensitive data private.
  • On-Device Machine Learning: Apple’s commitment to privacy is evident in its architecture. Unlike many voice assistants that rely on cloud-based processing, Siri performs most of its functions on-device, significantly reducing data sent to Apple’s servers. This also allows developers to leverage the Neural Engine in Apple’s A-series chips, which accelerates machine learning tasks and delivers smoother performance in AI-heavy applications.
  • Contextual Awareness: Siri’s contextual understanding is continuously improving. With Apple Intelligence, Siri doesn’t just respond to immediate commands; it can understand references to past interactions, recent media, and even your location. For example, you can ask, “What’s the weather like at my meeting location tomorrow?” and Siri can cross-reference your calendar with weather data to give a relevant answer. Developers can integrate similar functionality in their apps using Core ML’s context-awareness capabilities, allowing them to deliver smarter, personalized experiences.

For businesses looking to leverage AI in app development, partnering with an experienced iOS mobile app development company can significantly streamline the process of integrating AI-driven features like Siri and Core ML into apps. Such companies bring expertise and industry know-how that can accelerate development timelines while ensuring optimal performance.

Hire iOS Developers

3. Beyond Siri: Custom Machine Learning in iOS Apps

AI’s potential on iOS extends far beyond Siri. Core ML, Apple’s machine learning framework, enables developers to embed powerful AI models directly into their apps, unlocking the ability to create features that were previously complex or impossible to achieve.

Key AI Tools for iOS Developers:

  • Core ML 4: The latest version of Core ML makes integrating machine learning into apps easier than ever. With support for on-device model personalization, developers can now train models locally on user data without it ever leaving the device, preserving privacy while offering tailored experiences. Core ML also allows dynamic model updates, meaning your app can continue learning and adapting after the initial release.
    • Real-World Use Cases: For example, image recognition models can be used in photo-editing apps to automatically enhance images or identify objects. Natural language processing (NLP) models power chatbots and translation tools, while recommendation systems, like those in music or video streaming apps, use machine learning to suggest content based on individual preferences.
  • Personalization and On-Device Learning: Apps are increasingly expected to offer personalized experiences. With Core ML, developers can build models that continuously learn from user behavior—whether that’s curating music playlists, adjusting workout routines, or refining shopping recommendations. This on-device learning is more than just convenient; it’s central to the user experience in apps like Apple Fitness+, where data such as heart rate and activity levels are continuously analyzed to provide real-time feedback and suggestions.
  • Health and Fitness Applications: One of the standout uses of machine learning on iOS is in health and fitness. Using frameworks like HealthKit and Core ML, developers can create apps that track health data (e.g., heart rate, steps) and analyze it to deliver insights. MyFitnessPal, for example, uses machine learning to recommend calorie intake and exercise routines, adapting to users’ individual goals over time.
  • Natural Language Processing (NLP): NLP models are becoming increasingly sophisticated, allowing developers to build apps with enhanced text recognition, sentiment analysis, and language translation features. For instance, apps like Google Translate leverage neural machine translation models to provide highly accurate translations in real-time, breaking down language barriers on the go.

When building complex AI-driven apps, it’s essential to follow best practices and established design patterns in iOS. These patterns, such as Model-View-Controller (MVC) and Coordinator, provide developers with structured approaches to architecting scalable and maintainable applications.

4. The Future of AI in iOS Apps

Looking ahead, AI will play an even larger role in iOS app development, with several exciting trends already emerging.

Emerging Trends in AI for iOS:

  • Augmented Reality (AR): Apple’s ARKit integrates computer vision with machine learning to deliver immersive AR experiences. By combining real-time environmental data with AI, developers can create apps that overlay digital content in the real world with incredible precision. Expect more innovative uses of AR in fields like gaming, education, and retail.
  • Privacy-Focused AI: Apple is leading the industry in creating AI technologies that prioritize privacy. With on-device processing and the ability to personalize machine learning models locally, developers can provide intelligent, data-driven features without compromising user privacy. This trend will only grow as users become more conscious of how their data is handled.
  • Voice Assistants Beyond Siri: While Siri dominates Apple’s voice assistant landscape, Apple’s AI frameworks allow developers to create third-party voice assistants tailored to specific apps. These assistants could provide more specialized functionality, particularly in areas like customer service, healthcare, and IoT devices.

For businesses planning to launch AI-powered applications or expand existing solutions, it’s critical to hire iOS app developers with expertise in AI and machine learning. These developers will be familiar with Apple’s latest frameworks and design best practices, ensuring high-performance and privacy-compliant applications.

Conclusion

AI-powered iOS apps are driving the next wave of innovation, and Apple’s focus on privacy, on-device processing, and deep integration with Core ML and SiriKit gives developers powerful tools to build the apps of tomorrow. Whether you’re enhancing Siri’s capabilities, developing a personalized app, or leveraging AR for immersive experiences, AI is the engine behind it all. For developers and businesses alike, this is a golden opportunity to push the boundaries of what’s possible, creating smarter, more intuitive apps that anticipate users’ needs.

Shopify Plugin development

In today’s e-commerce landscape, Shopify reigns as one of the most popular platforms for online stores. But no matter how versatile and powerful Shopify is, there’s always room for improvement or customization. That’s where plugins—apps that integrate seamlessly into Shopify stores—come in. Developing your first Shopify plugin might sound intimidating, but with the right approach, it can be a highly rewarding endeavor, both creatively and financially.

If you’ve ever spotted a gap in Shopify’s features or had an idea for improving store functionality, this guide will take you through each step—from concept to launch. Whether you’re a business looking for custom solutions or an aspiring developer ready to explore Shopify development services, creating your own plugin is the perfect way to contribute to the vibrant Shopify ecosystem.

1. Idea Generation and Research

The Spark of Inspiration

Every successful Shopify plugin starts with an idea—perhaps you’ve noticed a gap in Shopify’s existing functionality, or you’re inspired to enhance certain aspects of the merchant experience. Write down your ideas and evaluate them by asking these key questions:

  • What specific problem does your plugin solve?
  • Who is your primary audience—store owners, developers, or customers?
  • How will your plugin enhance the Shopify experience, and is it scalable across different store sizes?

Defining these points early is crucial, as they’ll guide your development process, from features to marketing.

Market Research

Before diving into coding, research existing plugins in the Shopify App Store. This is a critical step for understanding market demand. Analyze the competition in terms of features, pricing models, and user reviews. Shopify development services can often assist at this stage to conduct thorough market research and provide valuable insights on current gaps and user needs.

Pro Tip: Stay up-to-date with Shopify’s API updates and roadmap. By anticipating upcoming platform changes, you can ensure your plugin remains relevant and functional in the long term.

2. Planning and Design

Wireframing

Start your planning by sketching the layout of your plugin, focusing on both the merchant-facing interface and customer-facing elements (if applicable). Tools like Figma or Sketch help create interactive prototypes, but you can start with basic wireframes. Shopify’s Polaris design system offers a great foundation for keeping your plugin visually consistent with Shopify’s admin dashboard.

Pro Tip: Freelance Shopify developers can be a great resource at this stage, offering expertise in creating user-friendly, functional designs that adhere to Shopify’s design guidelines while maintaining the unique identity of your app.

Define Features

Begin by outlining the core features your plugin will offer. Simplicity is key in the early stages—try to solve a single pain point effectively. You can always expand with additional features after launch.

Pro Tip: Focus on modularity and flexibility. Allow merchants to customize your plugin to their specific needs, which will broaden your app’s appeal.

Choose a Technology Stack

Selecting the right technology stack is crucial for both development and long-term maintenance:

  • Frontend: React and Shopify’s Polaris framework make for an excellent combination when designing user interfaces. Vue.js is another option for developers preferring a different structure.
  • Backend: Shopify supports several backend frameworks, but Node.js and Ruby on Rails are the most commonly used.
  • GraphQL API: While Shopify also provides a REST API, GraphQL is generally more efficient, especially when dealing with large datasets.

Pro Tip: Consider API rate limits and data scalability from the start. High-traffic stores with large amounts of data can put a strain on your app if you don’t manage API requests efficiently.

3. Development

Set Up Your Development Environment

To begin developing your plugin, set up the necessary tools:

  • Node.js: Required for backend development.
  • npm/yarn: For managing dependencies.
  • Shopify CLI: A vital tool for scaffolding and testing your app.
  • Tunnel Setup: Use tools like Ngrok to expose your local environment to Shopify during development.

Pro Tip: Use Shopify’s development stores for testing. These stores mimic real-world scenarios without impacting live customer environments.

Scaffold Your Project

Shopify CLI simplifies the setup process by scaffolding your project and creating the necessary files. From there, focus on building the core functionality, ensuring clean and modular code.

Build the UI

Your plugin’s frontend should be built using React along with Shopify’s Polaris components to maintain consistency. Keep the UI intuitive and mobile-responsive, as many merchants manage their stores on the go.

Pro Tip: If you’re handling sensitive data like customer details, prioritize security with encryption and follow Shopify’s strict data privacy guidelines.

Implement Backend Logic

The backend is where your plugin communicates with Shopify’s APIs. OAuth authentication, handling data retrieval, and executing custom logic form the core of the backend. If your app stores or processes data externally, consider reliable storage options like AWS or Firebase.

Pro Tip: Make use of queuing systems for bulk operations. This is particularly important if your plugin will handle bulk data updates or syncs across large stores.

Test, Test, Test

Thorough testing across various scenarios is critical. Use Shopify’s development stores to test API integration, performance, and app behavior in different merchant environments. Automated tests for frontend and backend components ensure that everything functions smoothly.

Pro Tip: Hire Shopify developers experienced in quality assurance to ensure your plugin works in real-world settings, across different Shopify themes, and under heavy usage loads.


4. Submission and Launch

Create a Partner Account

To list your plugin in the Shopify App Store, you’ll need a Shopify Partner account. This also gives you access to valuable tools like the Partner Dashboard for app management and tracking.

Create Your App Listing

Your app listing is your product’s storefront within the App Store. Make sure to craft a compelling description that clearly outlines your plugin’s benefits and use high-quality visuals, including screenshots and demo videos.

Pro Tip: Focus your description on the problems your app solves. Merchants need to quickly understand why they should install your plugin and how it adds value to their store.

Submit for Review

Before submitting your plugin, thoroughly review Shopify’s App Store guidelines. Shopify’s review process ensures compliance with their standards and usually takes a few days to a week, depending on the complexity of your plugin.

Pro Tip: Preemptively address common causes of rejection such as unclear functionality, poor UX design, or improper API usage.

Launch Day!

Once your plugin is approved, it’s time to launch! Promote your app through Shopify forums, your social media channels, and targeted email campaigns. If you offer early adopters a limited-time discount, it can help boost downloads and reviews.

Pro Tip: Use analytics tools to monitor user behavior and understand how merchants interact with your plugin. This data will help inform future updates and improvements.

5. Maintenance and Growth

Listen to Feedback

After launch, continuously monitor user feedback and reviews. Fix bugs quickly and listen to feature requests—this will help shape your roadmap for future updates.

Pro Tip: Consider incorporating a built-in feedback mechanism directly within the app. This allows you to gather feedback early and helps avoid negative reviews on the App Store.

Stay Updated

Shopify frequently updates its platform, and staying ahead of these changes is vital to ensuring that your plugin remains functional and secure.

Pro Tip: Subscribe to Shopify’s developer newsletters and attend Shopify Unite events to stay updated on platform changes and new opportunities for developers.

Marketing

Don’t rely solely on organic discovery through the App Store. Actively market your app through content marketing, affiliate partnerships, and by engaging with Shopify Experts. You can also offer free trials or freemium versions to increase adoption.

Pro Tip: Forge connections within the Shopify ecosystem. Building relationships with Shopify Experts, other app developers, and even merchants will help your app gain visibility and credibility.

Building your first Shopify plugin is just the beginning of an exciting journey. From initial concept to app store success, each stage requires careful thought, execution, and iteration. However, the true value of your plugin will be measured by its ability to evolve alongside Shopify’s platform and meet the growing needs of merchants.

Estimated Cost to Develop a Shopify Plugin

The cost of developing a Shopify plugin depends on various factors such as complexity, the development team, and feature set. Here’s a breakdown:

Development Team and Expertise

  • Freelance Shopify Developers: A cost-effective option with rates between $30–$150/hour.
    • Average Project Cost: $3,000 to $20,000.
  • Shopify Development Agencies: Agencies usually charge more but offer complete services, including project management, testing, and support.
    • Cost: $10,000–$50,000+ depending on the complexity.

Factors Influencing Cost

  • App Complexity:
    • Basic Plugin: $3,000–$10,000.
    • Intermediate Plugin: $10,000–$30,000.
    • Advanced Plugin: $30,000–$50,000+.
  • Ongoing Costs: Maintenance, updates, and customer support are recurring costs:
    • Monthly Maintenance: $500–$2,000.
    • Support: $1,000–$5,000 annually.
  • Marketing: Promoting your plugin is essential for gaining users.
    • Marketing Budget: $1,000–$5,000+.

To stand out, focus on solving real-world problems, maintaining strong performance, and responding to user feedback. Remember, the most successful plugins aren’t necessarily the most complex—they’re the ones that provide clear, measurable value to their users.

With persistence and strategic marketing, your app can become a valuable tool in the Shopify ecosystem, turning your idea into a thriving business that benefits merchants worldwide.